Route B — Step 1: Environment Setup
This is the manual route. You'll do every step by hand — which means you'll understand exactly what's happening and can debug any issues. By the end of these three pages, Jibo will be booted in developer mode with SSH access.
By following this guide you acknowledge that all actions are taken entirely at your own risk. The Jibo Revival Group, the authors of jibo.guide, and all community contributors are not responsible or liable for any damage, data loss, or permanent malfunction to your device. This process involves low-level hardware access and direct modification of your robot's firmware storage. If you are unsure about any step, ask for help on the Discord before continuing.
This guide uses a specific fork of ShofEL2 — devsparx's improvements branch. Do not use other forks. If the repo changes, the Discord #modding channel will have updated links.
What You Need
- A Linux machine (spare laptop, Raspberry Pi, desktop PC — anything with at least 32 GB free storage). CachyOS, Arch, Ubuntu, Debian all work. This guide uses CachyOS with a 6.x kernel, but you don't need to replicate that.
- A micro-USB cable that you know is a data cable (not charge-only — many phone charger cables are charge-only and will not work)
- Your Jibo's IP address — look this up before you start and write it down somewhere
- About 4–5 hours of patience
- Basic familiarity with the Linux terminal
You'll need Jibo's IP to SSH in after the mod. If you forget it, you'll have to redo hours of work. Check your router's device list or Jibo's settings screen (cog → Info → Network) and write it down.
Part 1 — Connect Jibo via USB (RCM Mode)
Jibo's NVIDIA Tegra K1 chipset has a Recovery Mode (RCM) that allows direct USB read/write access to the eMMC storage. We use this to dump and modify the firmware.
The USB port, Reset button, and RCM button are all located behind the circular panel on the back of Jibo's head. Remove or swing open that panel to access them.
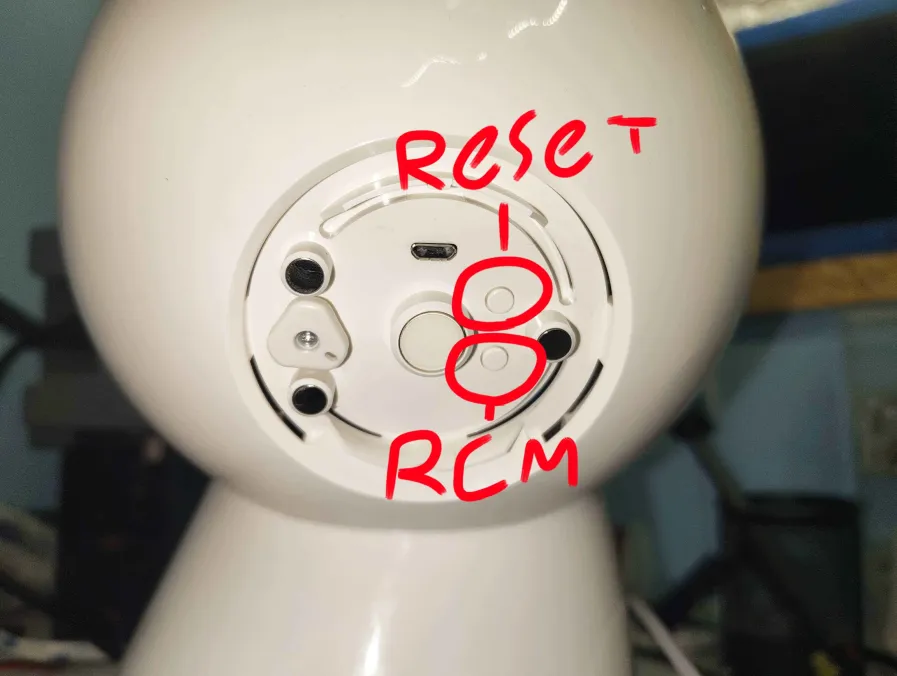
Back panel of Jibo's head. The micro-USB port is at the top; Reset and RCM buttons are circled.
- Open the panel on the back of Jibo's head to expose the ports. Plug your micro-USB data cable from your Linux machine into the micro-USB port at the top of the panel.
- Hold the RCM button (the lower of the two circled buttons — a small plastic button) while pressing the Reset button (the upper button, also small and plastic). Jibo will show a red light on his face ring and will not boot normally. This is correct.
-
Verify Jibo is in RCM mode on your Linux machine:
You should see a line like this:$ lsusb
The important part isBus 001 Device 007: ID 0955:7740 NVIDIA Corp. APX0955:7740. If you see0955:9134instead, that's an alternative PID that some units show briefly — try unplugging and re-entering RCM.
- Try a different USB cable — charge-only cables are the #1 cause of this
- Try a different USB port (avoid USB hubs)
- Make sure you held the RCM button the whole time while pressing reset
- Check the Troubleshooting page for more help
Part 2 — Install Dependencies
Install the build tools and libraries ShofEL2 requires:
Arch / CachyOS / Manjaro:
$ sudo pacman -S --needed base-devel libusb git python python-pipUbuntu / Debian / Raspberry Pi OS:
$ sudo apt update
$ sudo apt install build-essential libusb-1.0-0-dev git python3 python3-pip
Fedora:
$ sudo dnf groupinstall "Development Tools"
$ sudo dnf install libusb1-devel python3-pip
Part 3 — Clone and Build ShofEL2
We use a Jibo-specific fork of ShofEL2 (the Fusée Gelée exploit adapted for the
Tegra K1 / T124). Clone it from devsparx's improvements/IncreasedUSBReadWriteSpeed
branch:
$ cd ~
$ git clone -b improvements/IncreasedUSBReadWriteSpeed \
    https://github.com/devsparx/ShofEL2-for-T124.git
$ cd ShofEL2-for-T124/
$ make
If make exits with error code 1, don't panic. Check whether a
shofel2_t124 executable was created in the directory:
$ ls -la shofel2_t124If the file exists, the build succeeded. The error is a known quirk of the Makefile's exit handling.
Verify the build:
$ ./shofel2_t124 --helpYour environment is ready. Continue to the next step to dump Jibo's eMMC.