Route A — Automated Installer
The JiboAutoMod tool automates everything that Route B does by hand:
building ShofEL2, dumping the eMMC, locating the /var partition, patching
mode.json, and writing it back. It includes both a CLI and an optional
graphical interface.
JiboAutoMod performs the exact same steps as the Manual Route — it just handles the partition math, loop-mount, and hex conversion for you. If something goes wrong, the Troubleshooting page and the Manual Route explain every step in detail.
Requirements
- A Linux machine (recommended) — any distro with
apt,pacman, ordnf. Windows via MSYS2 also works — see Windows notes below. - At least 32 GB of free disk space (for the eMMC dump; fast mode uses ~500 MB)
- A micro-USB data cable — must be a data cable, not a charge-only cable
- Your Jibo's IP address (needed after modding for the update step)
- Python 3.8+,
git,gcc,make, andlibusbdev headers - About 1–4 hours depending on whether you do a full dump or fast mode
Make sure you know Jibo's IP address before you begin. You'll need it to SSH in after the mod. Check your router's DHCP table or use Jibo's settings screen (tap the settings cog → Info → network details).
Step 1 — Get the Tool
Clone the JiboAutoMod repository from GitHub:
$ git clone https://github.com/Jibo-Revival-Group/JiboAutoMod.git
$ cd JiboAutoModJoin the Jibo Revival Discord and ask in the #modding channel for the current repo link. The community keeps pinned resources up to date.
Step 2 — Install Dependencies
Pick the command for your OS:
Arch / CachyOS / Manjaro:
$ sudo pacman -S --needed base-devel libusb git python python-pipUbuntu / Debian / Raspberry Pi OS:
$ sudo apt update
$ sudo apt install build-essential libusb-1.0-0-dev git python3 python3-pip
Fedora:
$ sudo dnf groupinstall "Development Tools"
$ sudo dnf install libusb1-devel python3-pip
Step 3 — Put Jibo in RCM Mode
Jibo has a Recovery Mode (RCM) that lets us read and write the eMMC over USB. The USB port, Reset button, and RCM button are all behind the circular panel on the back of Jibo's head — open that panel first.
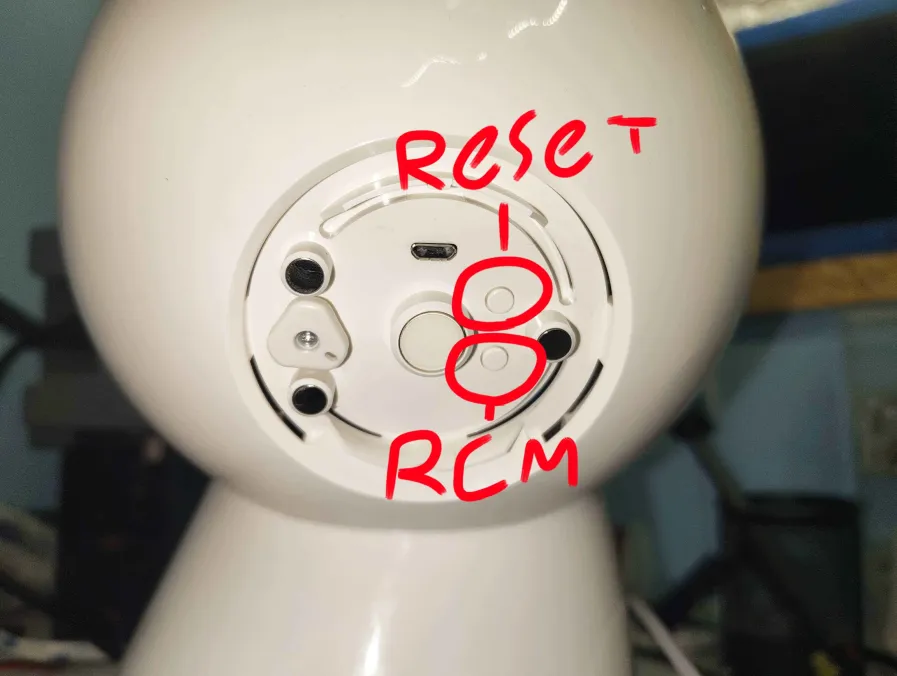
Back panel of Jibo's head. Micro-USB port at the top; Reset (upper) and RCM (lower) buttons are circled.
- Open the panel on the back of Jibo's head and plug your micro-USB data cable into the micro-USB port at the top of the panel.
- Hold the RCM button (the lower circled button) while pressing the Reset button (the upper circled button).
- Jibo will show a red light on his face ring and will not boot normally. This means RCM mode is active.
-
Confirm on your computer:
You must see the entry with$ lsusb | grep NVIDIA Bus 001 Device 007: ID 0955:7740 NVIDIA Corp. APX0955:7740before continuing.
If lsusb shows the device but the tool can't open it, run the
tool with sudo or install the udev rule from the repo
(99-jibo-rcm.rules):
sudo cp 99-jibo-rcm.rules /etc/udev/rules.d/
sudo udevadm control --reload-rules && sudo udevadm trigger
Step 4 — Run the Installer
Launch the bash launcher and choose your mode:
$ chmod +x jibo_automod.sh
$ ./jibo_automod.sh
The launcher will ask whether you want CLI mode (recommended) or GUI mode (optional Qt interface). Both run the same logic.
CLI Mode — Default (Full Mod)
Just press Enter to use the full workflow, which dumps the entire eMMC (~15 GB, takes 2–4 hours):
$ python3 jibo_automod.pyCLI Mode — Fast (Recommended if disk space is tight)
Fast mode reads only the GPT header and the /var partition (~500 MB),
patches mode.json, and writes back only the changed sectors. Much faster
but skips the full system backup:
$ python3 jibo_automod.py --mode-json-only
The eMMC contains your Jibo's calibration data — unique to your unit.
If you have the disk space, run the full dump at least once and keep
jibo_work/var_partition_backup.bin somewhere safe.
Step 5 — Wait for Completion
The tool will print progress as it works. When it's done, you'll see a summary and (optionally) an MD5 hash verification confirming the write succeeded.
When finished, unplug the USB cable, then hold Jibo's power button until the red LED goes off, and power him back on normally.
Step 6 — First Boot
Instead of his normal startup animation, Jibo will show a
large checkmark on his display. This means he has booted into
int-developer mode successfully.
SSH into Jibo from your computer:
ssh root@<jibo-ip>
# password: jibo
You now have full root access to your Jibo.
Head to SSH & Next Steps to learn what to do now, including installing the JiboOS community update.
Windows Notes
Windows is supported but requires extra setup:
-
Install MSYS2 and run:
pacman -S --needed mingw-w64-x86_64-gcc mingw-w64-x86_64-libusb python3 git e2fsprogs - Use Zadig to replace the driver for the NVIDIA APX (0955:7740) device with WinUSB. Without this, ShofEL2 cannot communicate with Jibo.
-
Run the installer as Administrator:
jibo_automod.bat
Many Windows users find it easier to use WSL2 and follow the Linux path. You'll still need USB passthrough into WSL — see the Microsoft usbipd-win guide.